【OCI入門】Ubuntu(WSL)へOCI CLI インストールと初期設定
Contents
概要
- こんにちわ、Oracle Cloud Infrastructure (OCI) 入門の続編です。今回は、Windows Subsystem for Linux (WSL2) 環境のUbuntuにOCI CLI をインストールし、oci setup config コマンドの初期設定、API キー登録までの手順を詳しくご紹介します。
- OCI CLI は、Oracle Cloud Infrastructure (OCI)のリソースをコマンドラインから直接操作するためのツールです。OCIの管理コンソールに代わり、リソースの作成や設定変更をターミナル上のコマンドで実行できます。これにより、作業の自動化やスクリプト化に役立ちます。また、OCI へのアクセスには、API キーの秘密鍵/公開鍵を使用します。
OCI CLI インストール手順
- pip コマンドを使用して、OCI CLI (oci-cli) をインストールします。一般ユーザーで、以下のコマンドを実行します。
-
pip install oci-cli –user
-
niikawa@niikawa2:~$ pip install oci-cli --user
Collecting oci-cli
  Downloading oci_cli-3.65.0-py3-none-any.whl.metadata (7.1 kB)
Collecting oci==2.159.0 (from oci-cli)
  Downloading oci-2.159.0-py3-none-any.whl.metadata (5.8 kB)
Collecting arrow>=1.0.0 (from oci-cli)
  Downloading arrow-1.3.0-py3-none-any.whl.metadata (7.5 kB)
Collecting certifi>=2025.1.31 (from oci-cli)
  Downloading certifi-2025.8.3-py3-none-any.whl.metadata (2.4 kB)
Collecting click==8.0.4 (from oci-cli)
  Downloading click-8.0.4-py3-none-any.whl.metadata (3.2 kB)
Requirement already satisfied: cryptography<46.0.0,>=3.2.1 in /usr/lib/python3/dist-packages (from oci-cli) (3.4.8)
Collecting jmespath==0.10.0 (from oci-cli)
  Downloading jmespath-0.10.0-py2.py3-none-any.whl.metadata (8.0 kB)
Requirement already satisfied: python-dateutil<3.0.0,>=2.5.3 in ./.local/lib/python3.10/site-packages (from oci-cli) (2.8.2)
Collecting pytz>=2016.10 (from oci-cli)
  Downloading pytz-2025.2-py2.py3-none-any.whl.metadata (22 kB)
Requirement already satisfied: six>=1.15.0 in /usr/lib/python3/dist-packages (from oci-cli) (1.16.0)
Collecting terminaltables==3.1.10 (from oci-cli)
  Downloading terminaltables-3.1.10-py2.py3-none-any.whl.metadata (3.5 kB)
Collecting pyOpenSSL<25.0.0,>=17.5.0 (from oci-cli)
  Downloading pyOpenSSL-24.3.0-py3-none-any.whl.metadata (15 kB)
Requirement already satisfied: PyYAML<=6.0.2,>=5.4 in /usr/lib/python3/dist-packages (from oci-cli) (5.4.1)
Collecting prompt-toolkit<=3.0.43,>=3.0.38 (from oci-cli)
  Downloading prompt_toolkit-3.0.43-py3-none-any.whl.metadata (6.5 kB)
Collecting circuitbreaker<3.0.0,>=1.3.1 (from oci==2.159.0->oci-cli)
  Downloading circuitbreaker-2.1.3-py3-none-any.whl.metadata (8.0 kB)
Collecting types-python-dateutil>=2.8.10 (from arrow>=1.0.0->oci-cli)
  Downloading types_python_dateutil-2.9.0.20250822-py3-none-any.whl.metadata (1.8 kB)
Collecting wcwidth (from prompt-toolkit<=3.0.43,>=3.0.38->oci-cli)
  Downloading wcwidth-0.2.13-py2.py3-none-any.whl.metadata (14 kB)
Collecting cryptography<46.0.0,>=3.2.1 (from oci-cli)
  Downloading cryptography-44.0.3-cp39-abi3-manylinux_2_34_x86_64.whl.metadata (5.7 kB)
Collecting cffi>=1.12 (from cryptography<46.0.0,>=3.2.1->oci-cli)
  Downloading cffi-1.17.1-cp310-cp310-manylinux_2_17_x86_64.manylinux2014_x86_64.whl.metadata (1.5 kB)
Collecting pycparser (from cffi>=1.12->cryptography<46.0.0,>=3.2.1->oci-cli)
  Downloading pycparser-2.22-py3-none-any.whl.metadata (943 bytes)
Downloading oci_cli-3.65.0-py3-none-any.whl (24.0 MB)
   ━━━━━━━━━━━━━━━━━━━━━━━━━━━━━━━━━━━━━━━━ 24.0/24.0 MB 21.3 MB/s eta 0:00:00
Downloading click-8.0.4-py3-none-any.whl (97 kB)
   ━━━━━━━━━━━━━━━━━━━━━━━━━━━━━━━━━━━━━━━━ 97.5/97.5 kB 6.5 MB/s eta 0:00:00
Downloading jmespath-0.10.0-py2.py3-none-any.whl (24 kB)
Downloading oci-2.159.0-py3-none-any.whl (31.7 MB)
   ━━━━━━━━━━━━━━━━━━━━━━━━━━━━━━━━━━━━━━━━ 31.7/31.7 MB 12.5 MB/s eta 0:00:00
Downloading terminaltables-3.1.10-py2.py3-none-any.whl (15 kB)
Downloading arrow-1.3.0-py3-none-any.whl (66 kB)
   ━━━━━━━━━━━━━━━━━━━━━━━━━━━━━━━━━━━━━━━━ 66.4/66.4 kB 6.4 MB/s eta 0:00:00
Downloading certifi-2025.8.3-py3-none-any.whl (161 kB)
   ━━━━━━━━━━━━━━━━━━━━━━━━━━━━━━━━━━━━━━━━ 161.2/161.2 kB 7.0 MB/s eta 0:00:00
Downloading prompt_toolkit-3.0.43-py3-none-any.whl (386 kB)
   ━━━━━━━━━━━━━━━━━━━━━━━━━━━━━━━━━━━━━━━━ 386.1/386.1 kB 20.9 MB/s eta 0:00:00
Downloading pyOpenSSL-24.3.0-py3-none-any.whl (56 kB)
   ━━━━━━━━━━━━━━━━━━━━━━━━━━━━━━━━━━━━━━━━ 56.1/56.1 kB 3.3 MB/s eta 0:00:00
Downloading cryptography-44.0.3-cp39-abi3-manylinux_2_34_x86_64.whl (4.2 MB)
   ━━━━━━━━━━━━━━━━━━━━━━━━━━━━━━━━━━━━━━━━ 4.2/4.2 MB 12.4 MB/s eta 0:00:00
Downloading pytz-2025.2-py2.py3-none-any.whl (509 kB)
   ━━━━━━━━━━━━━━━━━━━━━━━━━━━━━━━━━━━━━━━━ 509.2/509.2 kB 7.1 MB/s eta 0:00:00
Downloading cffi-1.17.1-cp310-cp310-manylinux_2_17_x86_64.manylinux2014_x86_64.whl (446 kB)
   ━━━━━━━━━━━━━━━━━━━━━━━━━━━━━━━━━━━━━━━━ 446.2/446.2 kB 21.8 MB/s eta 0:00:00
Downloading circuitbreaker-2.1.3-py3-none-any.whl (7.7 kB)
Downloading types_python_dateutil-2.9.0.20250822-py3-none-any.whl (17 kB)
Downloading wcwidth-0.2.13-py2.py3-none-any.whl (34 kB)
Downloading pycparser-2.22-py3-none-any.whl (117 kB)
   ━━━━━━━━━━━━━━━━━━━━━━━━━━━━━━━━━━━━━━━━ 117.6/117.6 kB 5.8 MB/s eta 0:00:00
Installing collected packages: wcwidth, pytz, circuitbreaker, types-python-dateutil, terminaltables, pycparser, prompt-toolkit, jmespath, click, certifi, cffi, arrow, cryptography, pyOpenSSL, oci, oci-cli
  Attempting uninstall: jmespath
    Found existing installation: jmespath 1.0.1
    Uninstalling jmespath-1.0.1:
      Successfully uninstalled jmespath-1.0.1
  Attempting uninstall: certifi
    Found existing installation: certifi 2024.2.2
    Uninstalling certifi-2024.2.2:
      Successfully uninstalled certifi-2024.2.2
Successfully installed arrow-1.3.0 certifi-2025.8.3 cffi-1.17.1 circuitbreaker-2.1.3 click-8.0.4 cryptography-44.0.3 jmespath-0.10.0 oci-2.159.0 oci-cli-3.65.0 prompt-toolkit-3.0.43 pyOpenSSL-24.3.0 pycparser-2.22 pytz-2025.2 terminaltables-3.1.10 types-python-dateutil-2.9.0.20250822 wcwidth-0.2.13

[notice] A new release of pip is available: 24.0 -> 25.2
[notice] To update, run: python3 -m pip install --upgrade pip
niikawa@niikawa2:~$
- OCI CLI (oci-cli) がインストールされました。
niikawa@niikawa2:~$ which oci
/home/niikawa/.local/bin/oci
niikawa@niikawa2:~$ oci -version
3.65.0
OCI CLI 初期設定手順
- oci setup config コマンドを使用して、OCI CLI (oci-cli) を初期設定します。
- 事前に、OCIの管理コンソールから、Profile → User information にて、「User OCID」を確認します。続けて、Profile → Tenancy informationにて、「Tenancy OCID」を確認します。
- 以下のコマンドを実行します。
- oci setup config
niikawa@niikawa2:~$ oci setup config
    This command provides a walkthrough of creating a valid CLI config file.

    The following links explain where to find the information required by this
    script:

    User API Signing Key, OCID and Tenancy OCID:

        https://docs.cloud.oracle.com/Content/API/Concepts/apisigningkey.htm#Other

    Region:

        https://docs.cloud.oracle.com/Content/General/Concepts/regions.htm

    General config documentation:

        https://docs.cloud.oracle.com/Content/API/Concepts/sdkconfig.htm


Enter a location for your config [/home/niikawa/.oci/config]:
Enter a user OCID: ocid1.user.oc1..xxxxxxxxxxxxxxxxxxxxxxxxxxxxxxxxxxxxxxxxxxxxxxxxxxxxxxxxxxxx
Enter a tenancy OCID: ocid1.tenancy.oc1..yyyyyyyyyyyyyyyyyyyyyyyyyyyyyyyyyyyyyyyyyyyyyyyyyyyyyyyyyyyy
Enter a region by index or name(e.g.
1: af-johannesburg-1, 2: ap-batam-1, 3: ap-chiyoda-1, 4: ap-chuncheon-1, 5: ap-chuncheon-2,
6: ap-dcc-canberra-1, 7: ap-dcc-gazipur-1, 8: ap-delhi-1, 9: ap-hyderabad-1, 10: ap-ibaraki-1,
11: ap-melbourne-1, 12: ap-mumbai-1, 13: ap-osaka-1, 14: ap-seoul-1, 15: ap-seoul-2,
16: ap-singapore-1, 17: ap-singapore-2, 18: ap-suwon-1, 19: ap-sydney-1, 20: ap-tokyo-1,
21: ca-montreal-1, 22: ca-toronto-1, 23: eu-amsterdam-1, 24: eu-budapest-1, 25: eu-crissier-1,
26: eu-dcc-dublin-1, 27: eu-dcc-dublin-2, 28: eu-dcc-milan-1, 29: eu-dcc-milan-2, 30: eu-dcc-rating-1,
31: eu-dcc-rating-2, 32: eu-dcc-zurich-1, 33: eu-frankfurt-1, 34: eu-frankfurt-2, 35: eu-jovanovac-1,
36: eu-madrid-1, 37: eu-madrid-2, 38: eu-marseille-1, 39: eu-milan-1, 40: eu-paris-1,
41: eu-stockholm-1, 42: eu-zurich-1, 43: il-jerusalem-1, 44: me-abudhabi-1, 45: me-abudhabi-2,
46: me-abudhabi-3, 47: me-abudhabi-4, 48: me-alain-1, 49: me-dcc-doha-1, 50: me-dcc-muscat-1,
51: me-dubai-1, 52: me-jeddah-1, 53: me-riyadh-1, 54: mx-monterrey-1, 55: mx-queretaro-1,
56: sa-bogota-1, 57: sa-santiago-1, 58: sa-saopaulo-1, 59: sa-valparaiso-1, 60: sa-vinhedo-1,
61: uk-cardiff-1, 62: uk-gov-cardiff-1, 63: uk-gov-london-1, 64: uk-london-1, 65: us-ashburn-1,
66: us-ashburn-2, 67: us-chicago-1, 68: us-gov-ashburn-1, 69: us-gov-chicago-1, 70: us-gov-phoenix-1,
71: us-langley-1, 72: us-luke-1, 73: us-newark-1, 74: us-phoenix-1, 75: us-saltlake-2,
76: us-sanjose-1, 77: us-somerset-1, 78: us-thames-1): ap-tokyo-1
Do you want to generate a new API Signing RSA key pair? (If you decline you will be asked to supply the path to an existing key.) [Y/n]:
Enter a directory for your keys to be created [/home/niikawa/.oci]:
Enter a name for your key [oci_api_key]:
File /home/niikawa/.oci/oci_api_key_public.pem already exists, do you want to overwrite? [y/N]: y
Public key written to: /home/niikawa/.oci/oci_api_key_public.pem
Enter a passphrase for your private key ("N/A" for no passphrase):
Repeat for confirmation:
Private key written to: /home/niikawa/.oci/oci_api_key.pem
Fingerprint: ab:cd:12:34:ab:cd:12:34:ab:cd:12:34:ab:cd:12:34
Do you want to write your passphrase to the config file? (If not, you will need to enter it when prompted each time you run an oci command) [y/N]:
Config written to /home/niikawa/.oci/config


    If you haven't already uploaded your API Signing public key through the
    console, follow the instructions on the page linked below in the section
    'How to upload the public key':

        https://docs.cloud.oracle.com/Content/API/Concepts/apisigningkey.htm#How2


niikawa@niikawa2:~$- 以下config ファイルに、設定が書き込まれました。
niikawa@niikawa2:~$ cat ~/.oci/config
[DEFAULT]
user=ocid1.user.oc1..xxxxxxxxxxxxxxxxxxxxxxxxxxxxxxxxxxxxxxxxxxxxxxxxxxxxxxxxxxxx
fingerprint=ab:cd:12:34:ab:cd:12:34:ab:cd:12:34:ab:cd:12:34
key_file=/home/niikawa/.oci/oci_api_key.pem
tenancy=ocid1.tenancy.oc1..yyyyyyyyyyyyyyyyyyyyyyyyyyyyyyyyyyyyyyyyyyyyyyyyyyyyyyyyyyyy
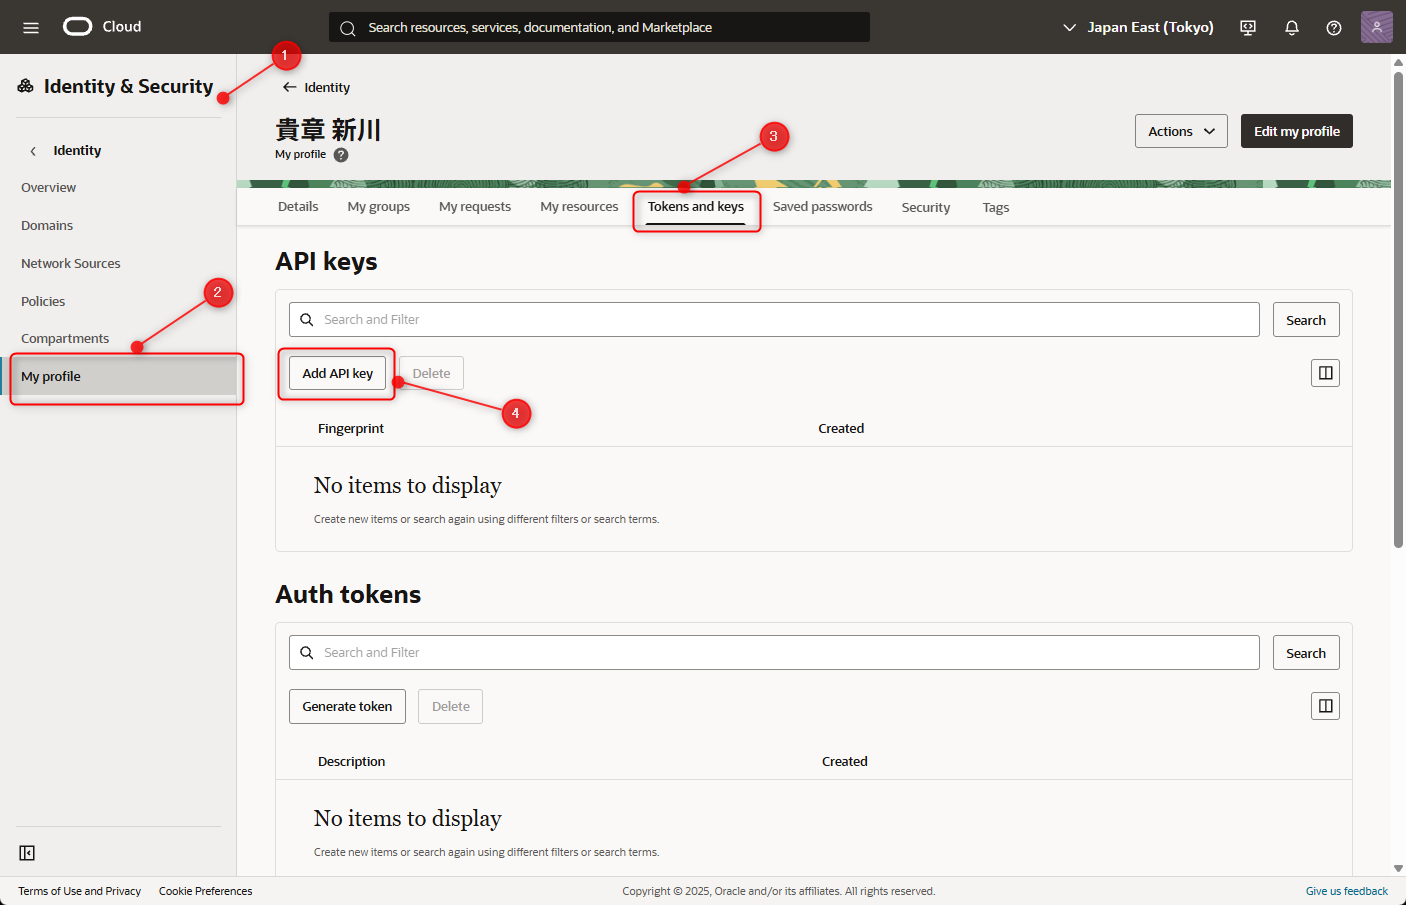
region=ap-tokyo-1- OCIの管理コンソールにて、左ナビゲーションから「Identity & Security」を選択します。My profile → Tokens and keys にて、API keys の「Add API key」を選択します。

- oci setup config コマンドによって作成された公開鍵の内容を確認します。
niikawa@niikawa2:~$ cat ~/.oci/oci_api_key_public.pem
-----BEGIN PUBLIC KEY-----
xxxxxxxxxxxxxxxxxxxxxxxxxxxxxxxxxxxxxxxxxxxxxxxxxxxxxxxxxxxxxxxx
yyyyyyyyyyyyyyyyyyyyyyyyyyyyyyyyyyyyyyyyyyyyyyyyyyyyyyyyyyyyyyyy
xxxxxxxxxxxxxxxxxxxxxxxxxxxxxxxxxxxxxxxxxxxxxxxxxxxxxxxxxxxxxxxx
yyyyyyyyyyyyyyyyyyyyyyyyyyyyyyyyyyyyyyyyyyyyyyyyyyyyyyyyyyyyyyyy
xxxxxxxxxxxxxxxxxxxxxxxxxxxxxxxxxxxxxxxxxxxxxxxxxxxxxxxxxxxxxxxx
yyyyyyyyyyyyyyyyyyyyyyyyyyyyyyyyyyyyyyyyyyyyyyyyyyyyyyyyyyyyyyyy
xxxxxxxx
-----END PUBLIC KEY-----
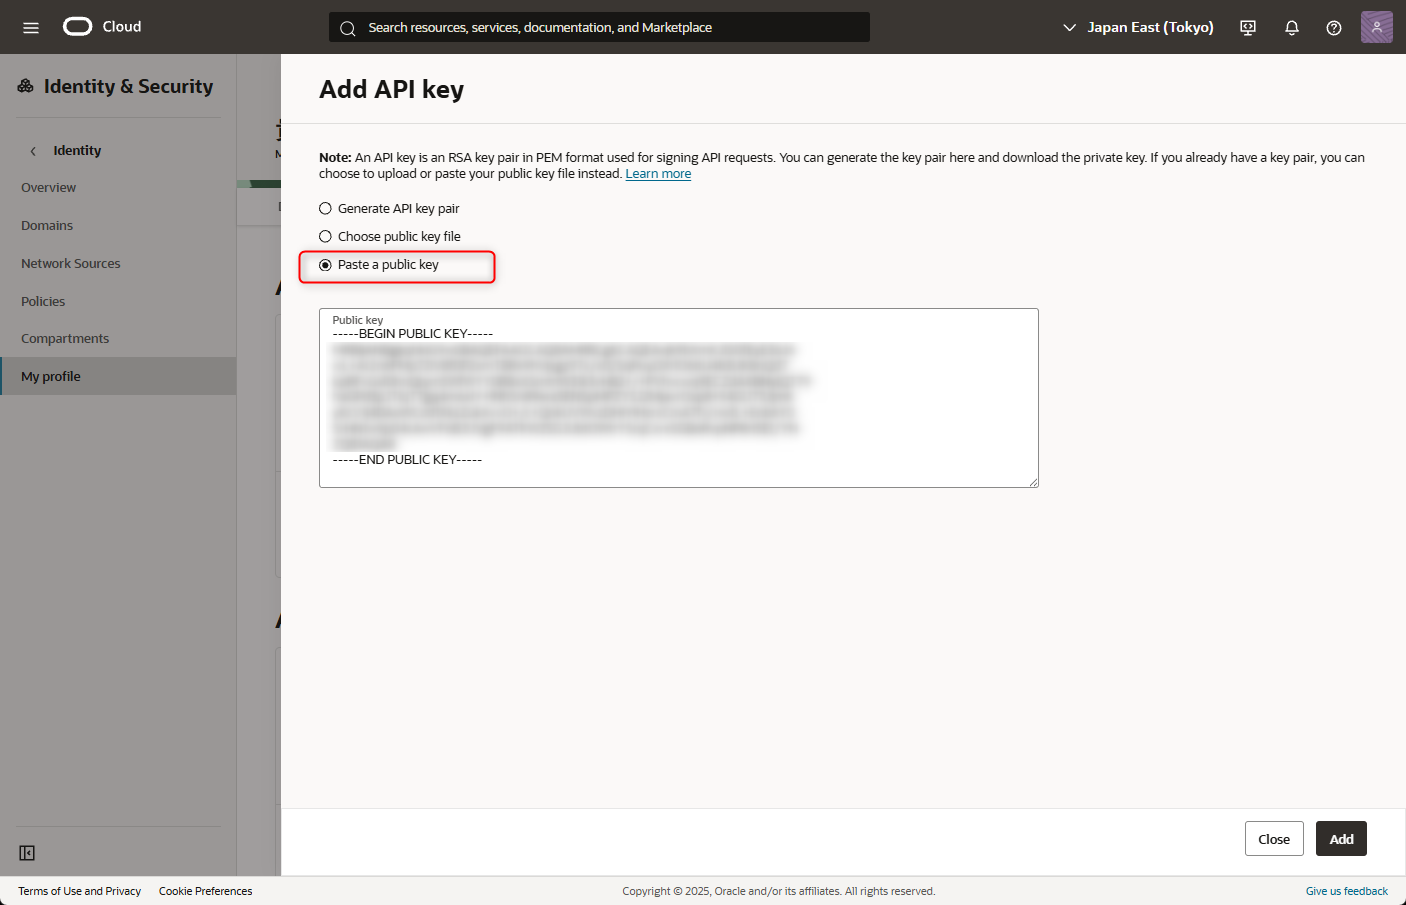
- 続けて、「Paste a public key」を選択して、公開鍵を貼り付けます。「Add」を選択します。

- 「Close」を選択し、API キーが登録されたことを確認します。
- 試しに、OCI CLI を実行します。oci setup config コマンドで指定したパスフレーズを入力します。
niikawa@niikawa2:~$ oci network vcn list --compartment-id ocid1.tenancy.oc1..yyyyyyyyyyyyyyyyyyyyyyyyyyyyyyyyyyyyyyyyyyyyyyyyyyyyyyyyyyyy
Private key passphrase:
課題
課題1: ServiceError にて401 エラー出力
- OCI CLI を実行時に、ServiceError となり、"status": 401 が出力されました。少し焦りますが、OCIの管理コンソールにAPI キーを登録していないことが原因と分かりました。
niikawa@niikawa2:~$ oci iam compartment list
Private key passphrase:
ServiceError:
{
    "client_version": "Oracle-PythonSDK/2.159.0, Oracle-PythonCLI/3.65.0",
    "code": "NotAuthenticated",
    "logging_tips": "Please run the OCI CLI command using --debug flag to find more debug information.",
    "message": "The required information to complete authentication was not provided or was incorrect.",
    "opc-request-id": "FE6B8E76EAD04ED285340B37830097DE/D6D2DC285B307B29FE9DAF684E525438/F0EB892DE22D15889FF5BC043AD26965",
    "operation_name": "list_compartments",
    "request_endpoint": "GET https://identity.ap-tokyo-1.oci.oraclecloud.com/20160918/compartments",
    "status": 401,
    "target_service": "identity",
    "timestamp": "2025-08-28T00:08:30.931587+00:00",
    "troubleshooting_tips": "See [https://docs.oracle.com/iaas/Content/API/References/apierrors.htm] for more information about resolving this error. If you are unable to resolve this issue, run this CLI command with --debug option and contact Oracle support and provide them the full error message."
}
課題2: OCI CLI 実行時の Private key passphrase
- OCI CLI 実行時に秘密鍵のパスフレーズ入力を求められるため、煩わしいですね。ssh-agent のツール導入で改善されそうです。
課題3: WSL2のUbuntu 時刻ズレ
- WSL2のUbuntu 時刻ズレが起きるとコマンドが実行できません。PowerShell からWSL のshutdown を行い、再度ターミナルを開く必要があります。
